
Hello Everyone, welcome to the second part of Varnish integration in Magento 2, in my previous blog I gave a brief overview of varnish cache, its management process, and storage methods. In this blog, I will show you the steps to install varnish software and configure it with the Magento installation.
Varnish installation
The following steps will show you how to install a varnish cache on your Linux system. For this demonstration, I am using a ubuntu OS.
Let’s execute the following step from our terminal to install varnish software.
curl -L https://packagecloud.io/varnishcache/varnish41/gpgkey | sudo apt-key add -
If you are getting an error related with your curl library then execute the following command to install CURL on your system
sudo apt install php7.0-cur //choose your PHP CURL version properly
Or try following steps
sudo apt update
sudo apt install curl
Then open /etc/apt/sources.list.d/varnishcache_varnish41.list file in any text editor or execute the following command from your terminal
sudo nano /etc/apt/sources.list.d/varnishcache_varnish41.list
deb https://packagecloud.io/varnishcache/varnish41/ubuntu/ trusty main
deb-src https://packagecloud.io/varnishcache/varnish41/ubuntu/ trusty main
Then execute the following command to update the packages
sudo apt-get update
sudo apt-get install varnish
Configure Varnish
Once you install the varnish software, you are able to see some basic configuration in /etc/default/varnish file. For systemd, the VCL file is directed in a different manner. It will be located in /etc/systemd/system/varnish.service
If you open the varnish.service file you will find the -f points to a default VCL file, if you want to know more about the VCL, check out my previous blog for more information.
-f /etc/varnish/default.vcl
Open /etc/default/varnish file and locate VARNISH_LISTEN_PORT and set it to 80 or the port number you want to set. Our next step is to configure default.vcl file to set our backend details.
update the following code in your default.vcl file
backend default {
     .host = "127.0.0.1";
     .port = "8080";
}
Now, make sure your apache server listens to 8080 port(or any other port, but, it should match the .port value from default.VCL file)
Listen 8080
It’s typically inside apache2.conf or in ports.conf. Restart your varnish and apache server using the following command
Sudo service varnish restart
Sudo service apache2 restart
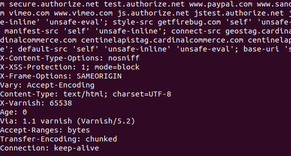
To verify our varnish is configured properly and it’s working well with Magento, execute the following command from your terminal.
curl -I http://<your-magento-application>
And you will see the following output in your HTML header.
X-Varnish: 65538
Age: 0
Via: 1.1 varnish (Varnish/5.2)
Accept-Ranges: bytes
Transfer-Encoding: chunked
Connection: keep-alive
That’s all for now. Please let me know your thoughts about this blog down in the comment section. Good bye for now and happy coding 🙂
[post-views]


